Using Analytics — Part 2
In this chapter we consider further practicalities of using design analytics:
-
The catalogue — How-to store, retrieve and manage our analyses and the conventions involved in using the shared areas.
-
Dissemination — How-to make our work available for others at our institution to use.
The catalogue
You will be able to share your work using the institutional shared folders available via the catalogue with others who also have the "Design Analytics" role.
As we discovered in the introduction, the catalogue presents a hierarchical file system manager style of interface to the management of analytics components within OAS. Before continuing we have some warning notes:
These points are important to note about managing your work in the catalogue.
-
Your work is only safe from interference and private when stored in your "My Folders" or a sub-directory thereof.
-
If you store work in "Shared Folders/NameOfMyInstitution" anybody with the design analytics role at your institution can overwrite or delete[1] your work (unless you change the default permissions).
-
If you store work in "Shared Folders/Community" anybody with the design analytics role at any Alma institution can overwrite or delete[1] your work (unless you change the default permissions).
So, develop analytics stored within My Folders adopting an appropriate sub-directory structure for projects, experiments, etc. Then release to others (by copy to shared folders) in your institution or the wider community in the appropriate folders in "Shared Folders".
Fortunately, little appears to go wrong in the catalogue shared folders. People appear to be aware of these limitations and work round them.
It is worthwhile to look around the Alma and Community folders for Analytics to see what other people have done and shared. If you "Open" or execute them then the analyses always use your own institutions data. If you think these shared analyses would be useful to you then take a copy to your own personal folders or your institutions folders. Then you can modify it as required without disturbing others work flow.
It is a good to have a documented institutional policy/structure for people using design analytics and the catalogue. This will aid maintenance and usability in the longer term, even if it is only one or two people working with designing analytics.
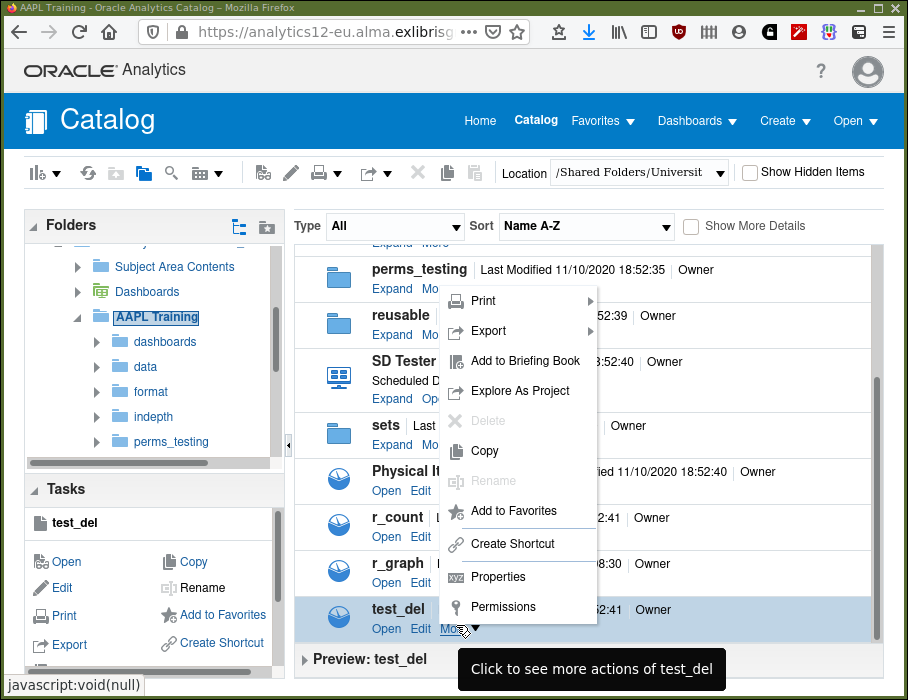
Permissions on analytics objects
When in the catalogue permissions for an object can be accessed by selecting
the More menu for the object as shown in Figure 1.
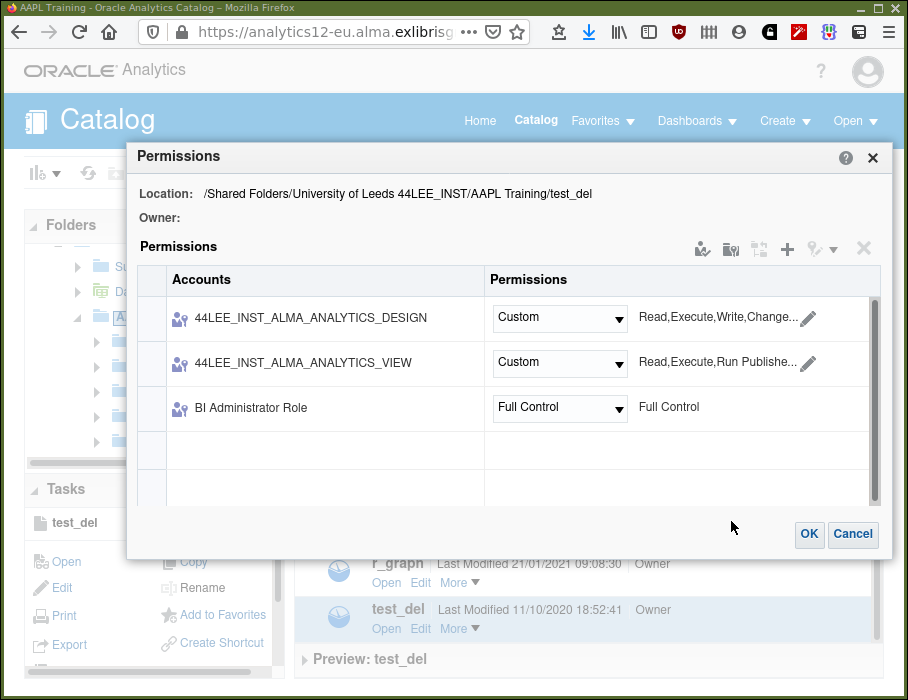
After Permissions has been selected, the screen shown in Figure 2 is
presented. This shows the permissions allocated on the object. We will
usually be interested in permissions for "ALMA_ANALYTICS_DESIGN". To edit the
permissions select the edit "pencil" icon( ).
).
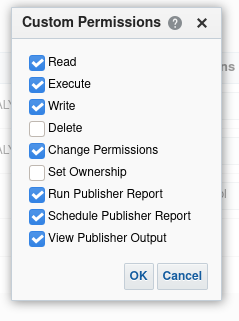
Now we have the panel shown in Figure 3 where changed can be made and saved by clicking "OK" or discarded using "Cancel". In most circumstances where we wish to use this functionality we want to modify the "Write" and "Delete" permissions.
The accompanying video shows the effect of permissions for "ALMA_ANALYTICS_DESIGN" users.
Dissemination
After developing some analyses, we are going to want to share the results with colleagues. If the people we want to share with have design analytics role then the analyses can be placed in the catalogue in your institutions shared folders. Colleagues will then be able to open, view and edit those analyses in the same fashion as you are able to.
Now we consider the other ways in which the analyses can be shared with colleagues where it is not necessary for those colleagues to have the specific role for design analytics.
Widgets
A "widget", in this context, is a small box of information that can be added to the main Alma screen that you see when you log in. On the left of your main Alma screen there is a plus button. If you hover the mouse over it, a tool tip "Manage Widgets" will appear. Clicking the button brings up a list of defined widgets, that you have access to, for your institution. They can be added to your main Alma screen by ticking the tick-boxes. Notice that the standard "Keep Up With Alma" information box is a widget.
Let’s take a look at widget configuration in the analytics objects
editor. Again, as before, from the main Alma screen after login select
. From this screen, shown in the section
on "Analytics objects", select Add New
Analytics Object. Provide the information needed, a folder and an analysis,
ensuring the "Type" is set to "Widget". Using the "Roles" editor assign the
roles and save. Return to the Alma main screen or home page and now this widget
can be added to your home Alma page.
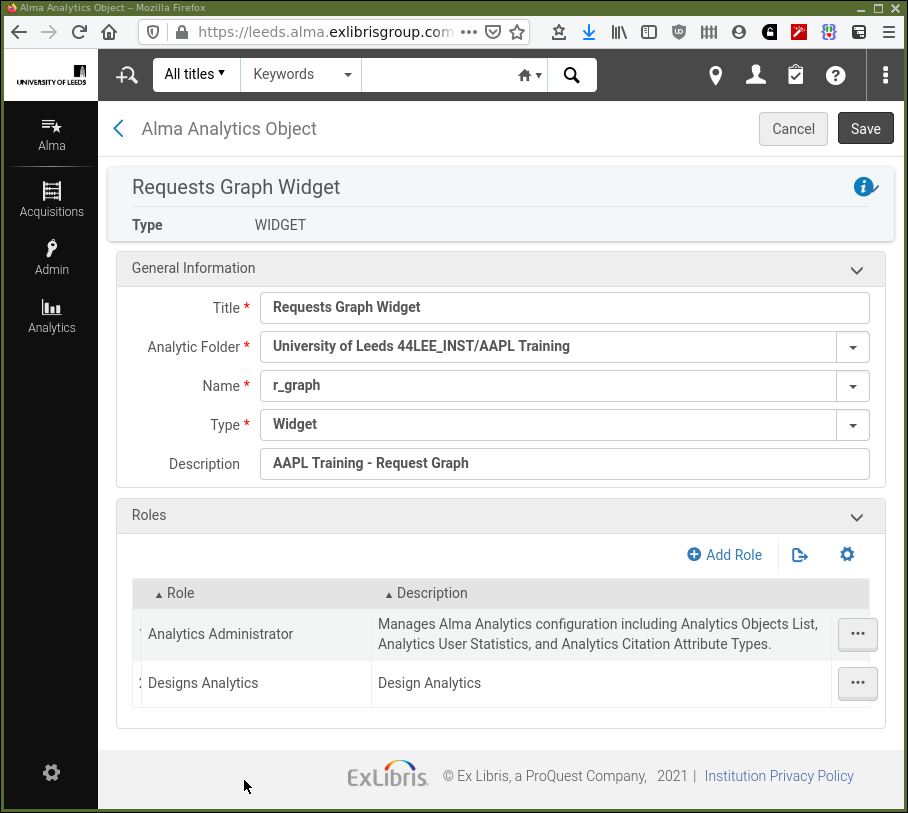
Consider Figure 4. We can see that:
-
we are defining an analytics object of type "WIDGET"
-
the title is "AAPL Training - Requests Graph"
-
the source analysis name is "r_graph"
-
that analysis is located in the folder "University of Leeds 44LEE_INST/AAPL Training"
-
the widget is for users with the roles of "Designs Analytics" and "Analytics Administrator"
Dashboards
A Dashboard can be added to the Alma Analytics menu (available from the home screen). Again, using the "Analytics Object List" editor a dashboard object can be created, encapsulating a dashboard object and with assigned roles. This dashboard will then be available to users, with those roles, from the Alma Analytics menu.
Scheduled email of Analyses and Dashboards
An analytics object can be defined to execute an analysis at a scheduled time and send the results in text, spreadsheet or PDF to subscribers of that analytics object. Let’s consider the Alma Object Editor screenshot shown in Figure 5.
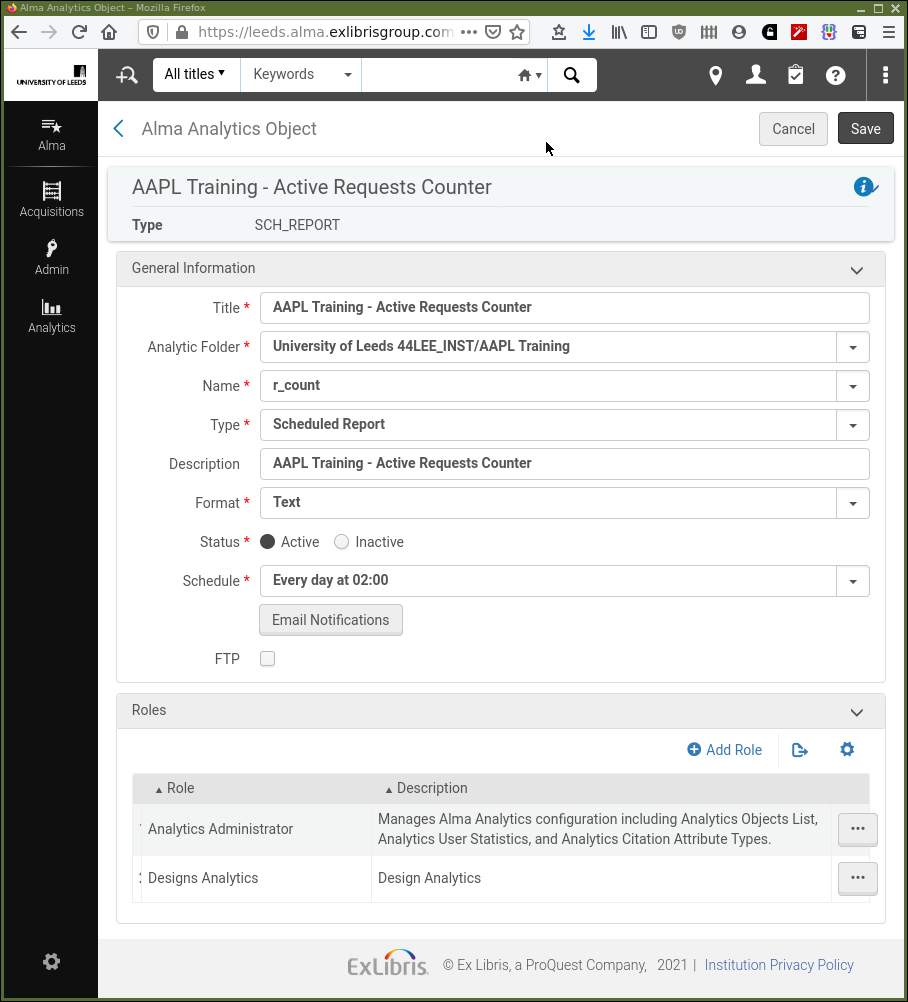
It is very similar to editing the object for a "widget" as seen previously. We can see:
-
we are editing an object of type "Scheduled Report".
-
the output format is "Text" (it can also be set to "PDF" or "Excel").
-
the analysis has the status of "Active".
-
it will run every day at 2 in the morning.
-
the "Email Notifications" button brings up a further configuration screen which will email a notification about the success or error of the scheduled analysis. It’s about the analysis processing rather than the analysis itself and hence is mainly aimed at system administrators.
-
it’s possible to have it delivered to a pre-defined FTP server if the "FTP" tick box is checked. After it arrived it could be processed however is required.
Using Analytics — 1 & 2 — final points
In the previous two chapters, along with the introduction, there has been a great deal of detail about accomplishing basic tasks in AAPL. The text, screenshots and accompanying videos have been intended to make sure you can get started. That you can start to navigate your way around with some confidence and most importantly to explore and experiment.
Exercises
-
Now we have all the pieces in place for managing analyses and the process of creating and subscribing to an analytics object. Do this for one or more of your own analyses. Make one analysis a scheduled by email report and verify that the process works as expected and emails containing the analyses are received. It’s worth checking that this works as expected. There is a lot of network and internet "plumbing" involved between invoking the actual analysis, and it’s arrival in a mail inbox.